برنامه نویسان خبره
برنامه نویسان خبرهبرنامه نویسان خبره
برنامه نویسان خبرهHow to move WordPress from a subfolder
How to move WordPress from a subfolder
This article will take you through the process of moving your WordPress website from the subfolderyourdomain.com/wp to the domain root – yourdomain.com:
NOTE: Before proceeding with any changes, make sure that you generate a full backup of your website. If you’ve created your site using Softaculous script installer, feel free to refer to this guide as well (step #4 – Backup software).
for cPanel paper_lantern theme:
Re-installation
Redirection
File migration and Database update
Re-installation
If you just installed your website and have done no or little development, WordPress re-installation will be the easiest way out.
You just need to go back to cPanel > Exclusive for Namecheap Customers section > Softaculous Apps Installer menu:

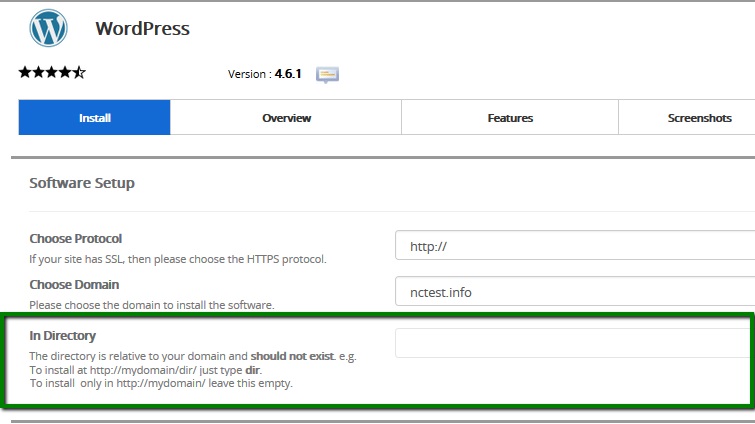
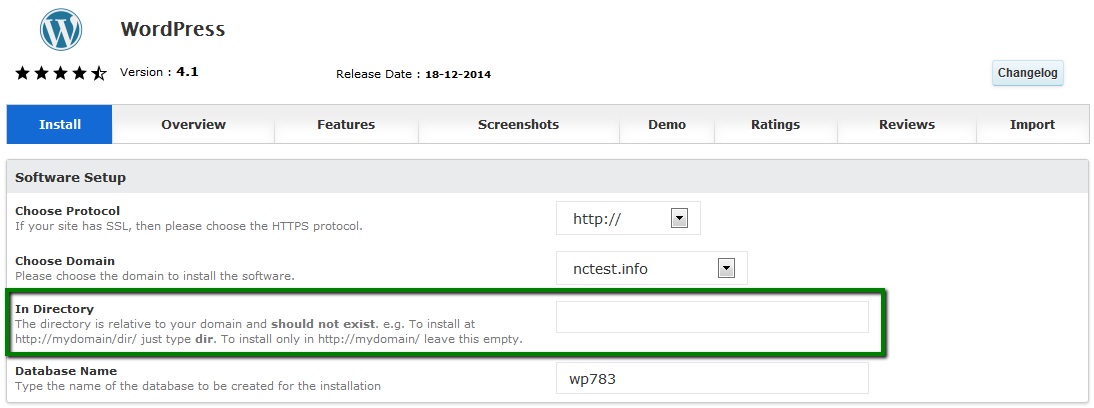
Create a new one, make sure the In Directory field is empty and proceed with the installation:
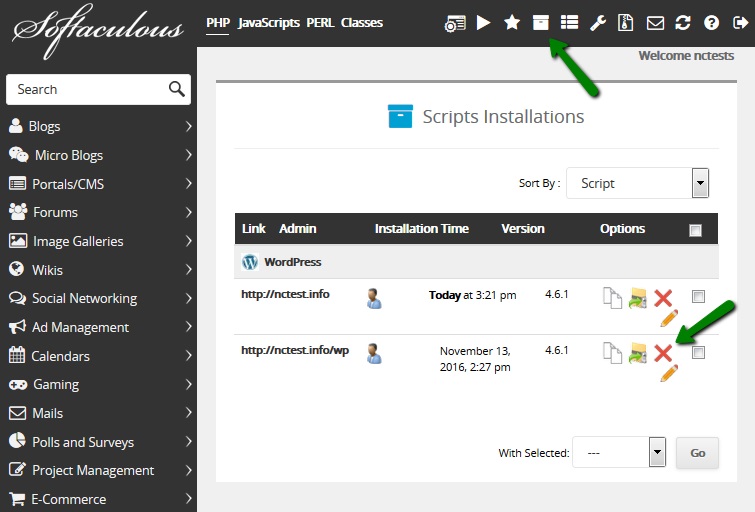
Do not forget to uninstall /subfolder website by hitting the red cross in All Installations menu:
Redirection
If the website is pretty much done and re-installation is not acceptable, you can set up a hidden redirect – the installation will remain in the subfolder, but your website homepage will be yourdomain.com.
Take into account that this redirect will make /subfolder disappear only on the homepage, links will still have it – e.g., yourdomain.com/subfolder/contactus.
If it sounds alright to you, add the following redirect to .htaccess file in the domain web root (replacing yourdomain.com with your actual domain name and subfolder with your subfolder):
RewriteEngine On
RewriteCond %{HTTP_HOST} ^(www\.)?yourdomain.com$
RewriteCond %{REQUEST_URI} !(/|\.[^/]*)$
RewriteRule (.*) http://www.yourdomain.com/$1/ [L,R=301]
RewriteCond %{HTTP_HOST} ^(www\.)?yourdomain.com$
RewriteCond %{REQUEST_URI} !^/subfolder/
RewriteRule ^(.*)$ /subfolder/$1
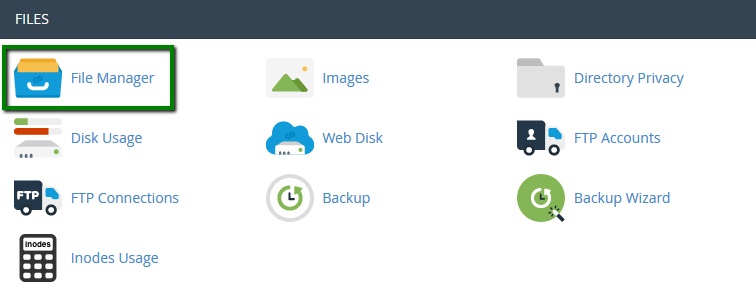
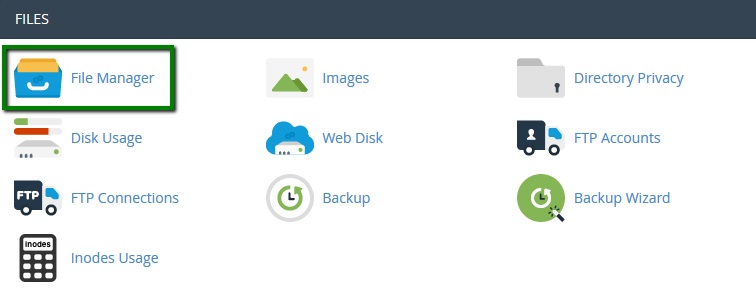
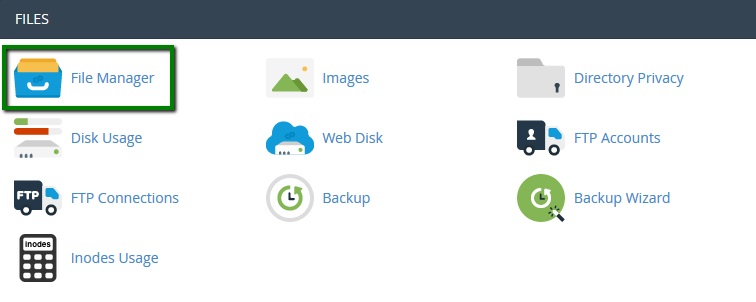
1. Navigate to Files section > File Manager:
2. Move to the root folder for your WordPress installation – public_html in case it is the main domain for your account.
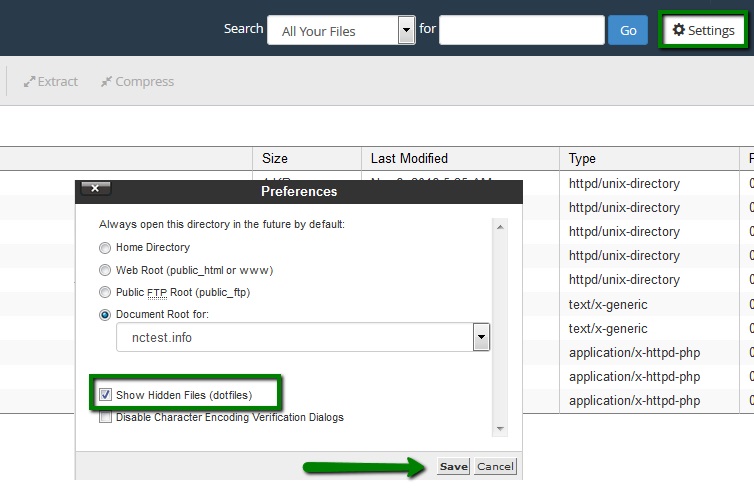
Once there, make sure that Show Hidden files (dotfiles) option is enabled in Settings menu:
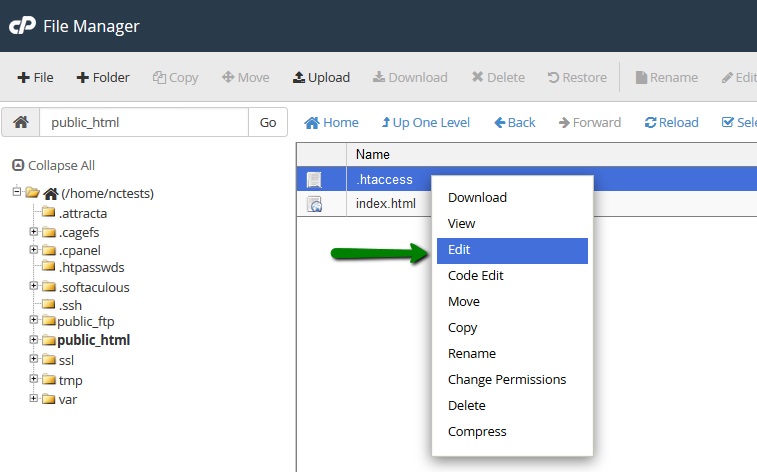
3. Locate .htaccess file, right-click > Edit:
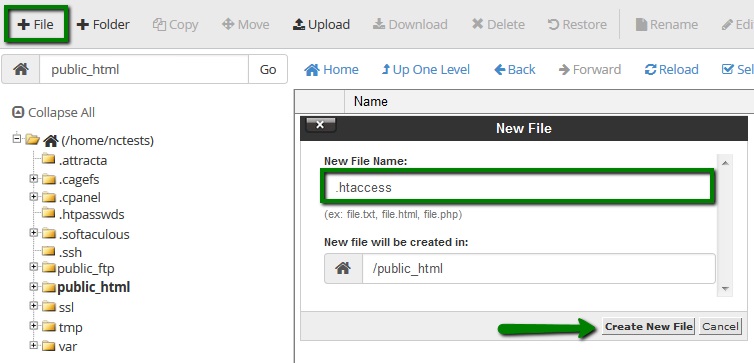
4. If there is no .htaccess file located in your File manager, feel free to create a new one using File option:
You are ready to add the redirect rule and save it.
File migration and Database update
If the option above does not work for you, and you would like to make sure there is no /subfolder on your website, you can go this way.
NOTE: We highly recommend to back up website files and the database before proceeding.
1. File migration
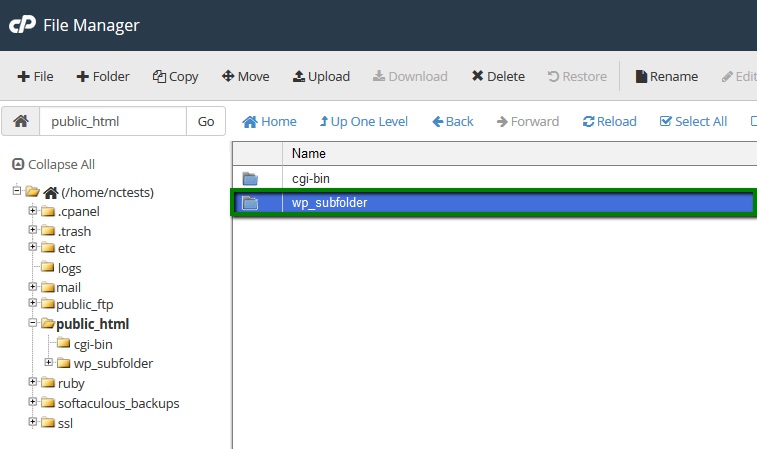
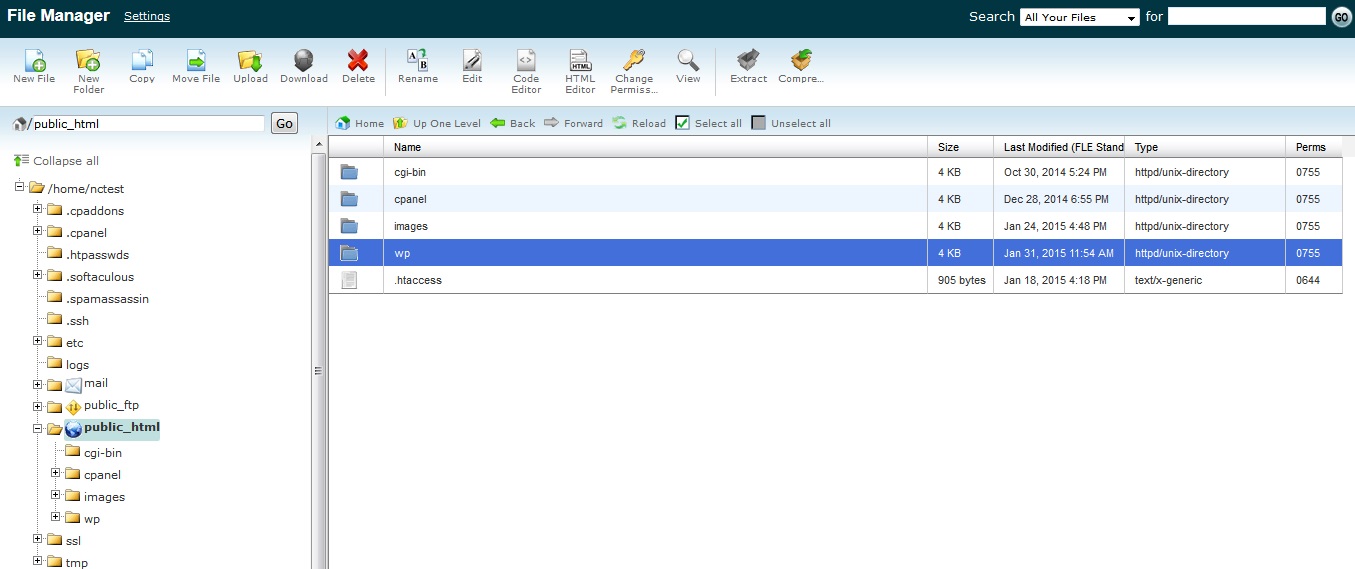
Go to your website folder using FTP or File Manager:
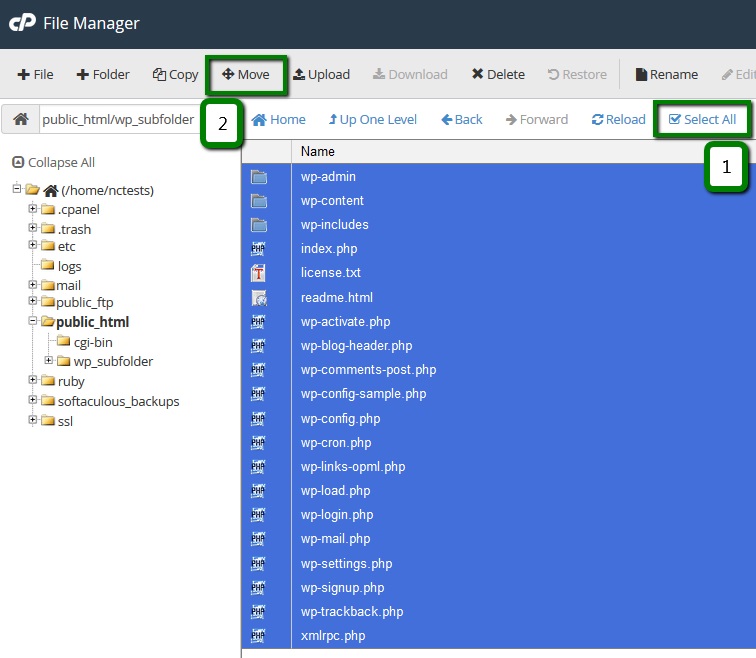
Select All files > Move them to the domain document root (in our example, from public_html/wp_subfolderto public_html):
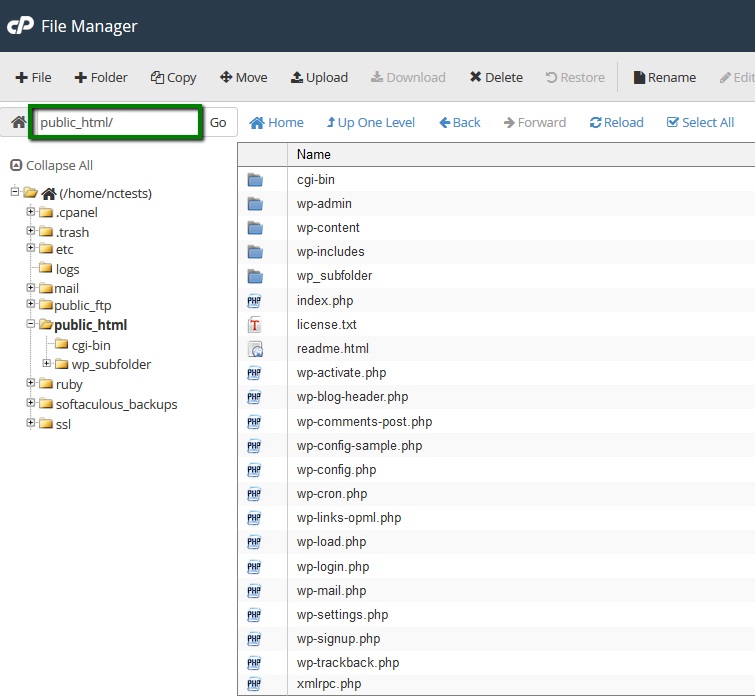
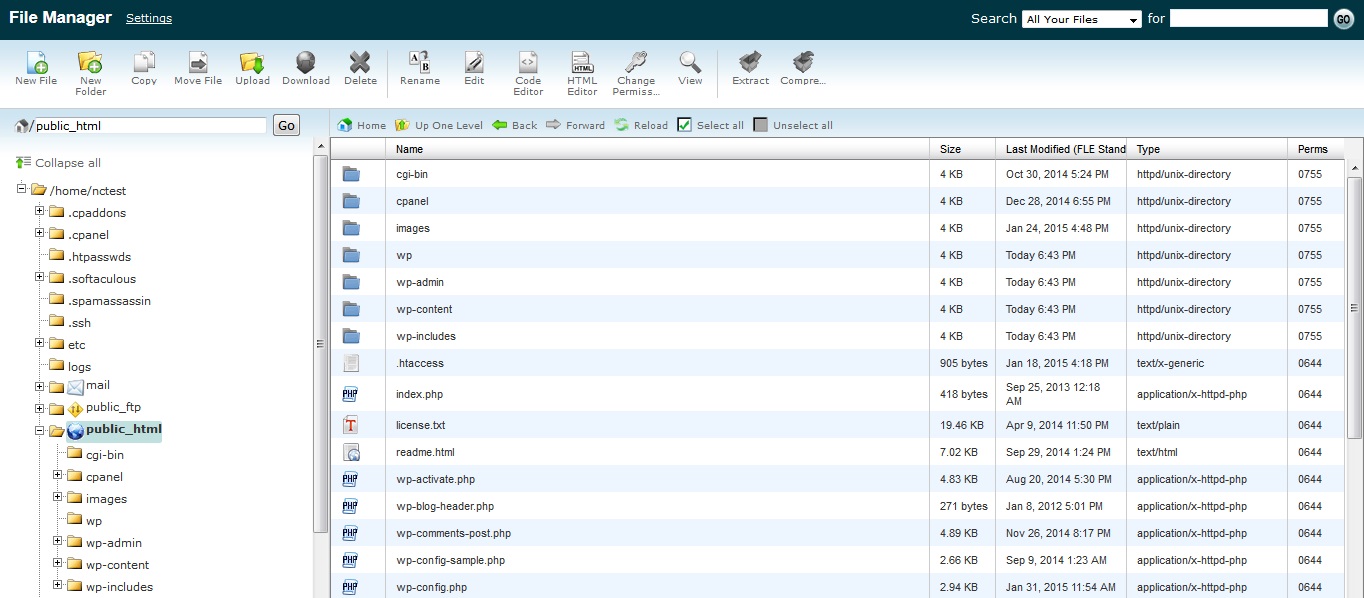
Once done, go back to the domain document root to make sure all files have been moved:
2. Database update
You can update old URL references with the new ones in the database either using search and replace scripts or using text editors. Below we provide the guidelines using the latter:
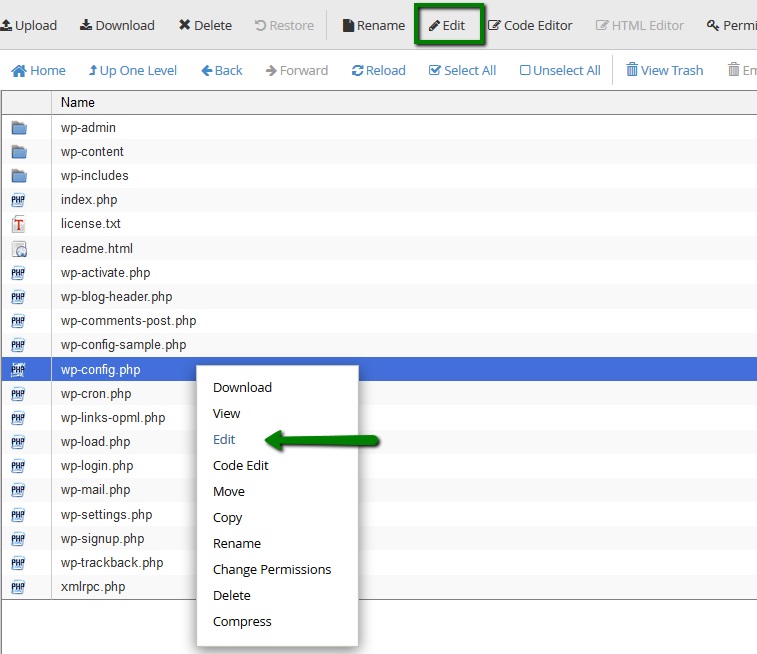
1. To begin with, you will need to locate the database associated with your website. Right-click on the file > View or Edit option:
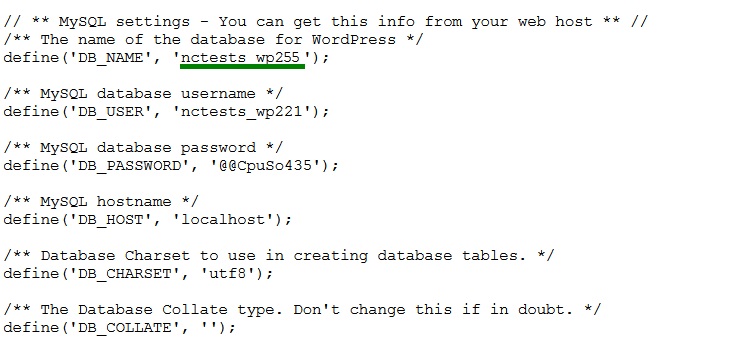
You will see the database name in this line:
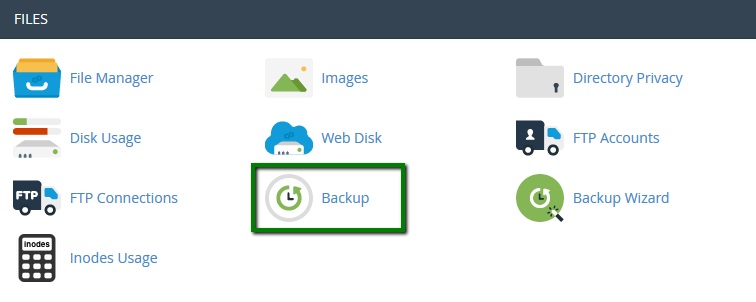
3. The next steps is to download the backup of the database. It can be done in your cPanel > Files section > Backup menu:
4. Unzip the downloaded file. Now you can open .sql file with some text editor and update all the URL references.
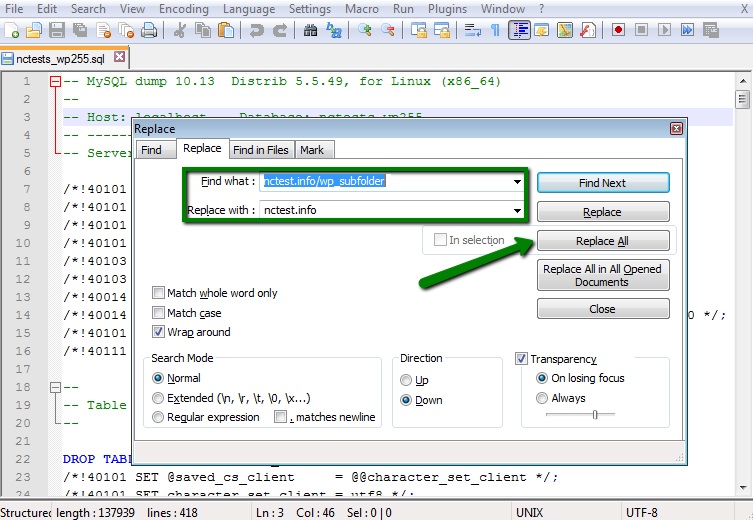
Hit Ctrl + F and select Replace option. Fill out the corresponding fields, Find – your old domain, Replace – your new domain) and hit Replace All:
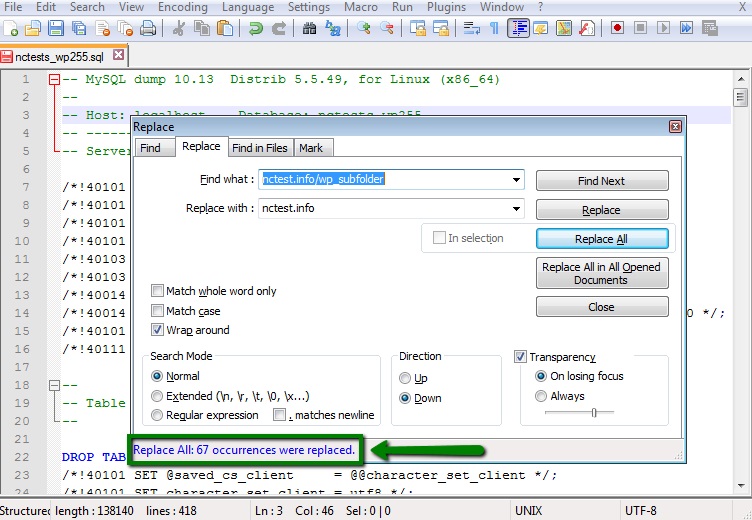
5. Once done, you should get the output like this:
Make sure that you save the changes.
6. Now you can upload the updated database to your cPanel account. To be on the safe side, we suggest creating a new database (instead of dropping the existing one) and connect it to your WordPress side.
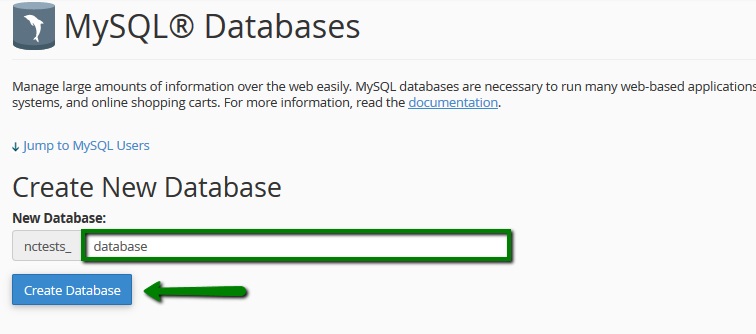
To do so, move to Databases section > MySQL Databases menu:
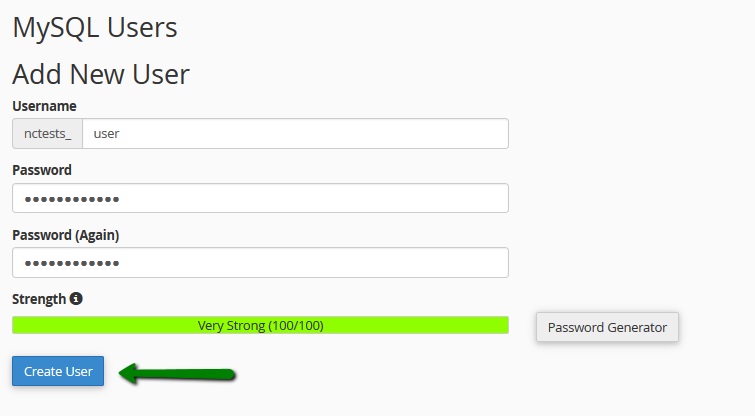
7. Follow the steps below to create a new database and user for it:
Keep these details, you will need to use them a bit later.
8. After that you can upload the database using phpMyAdmin menu in Databases section:
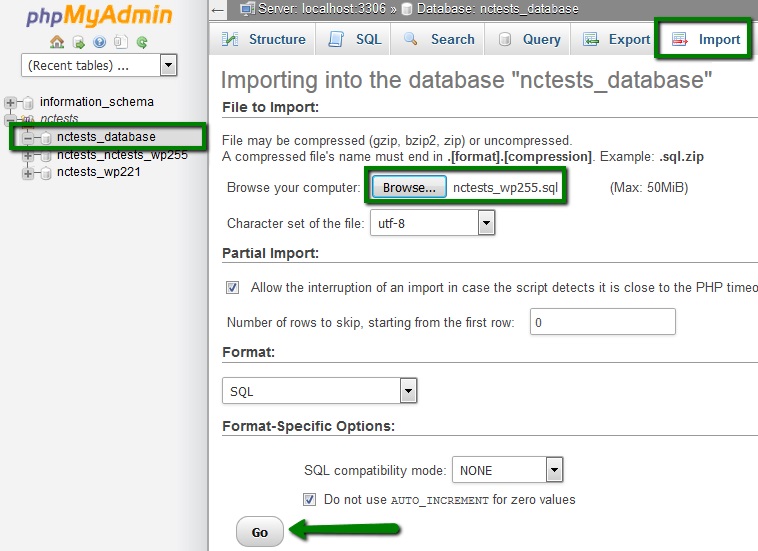
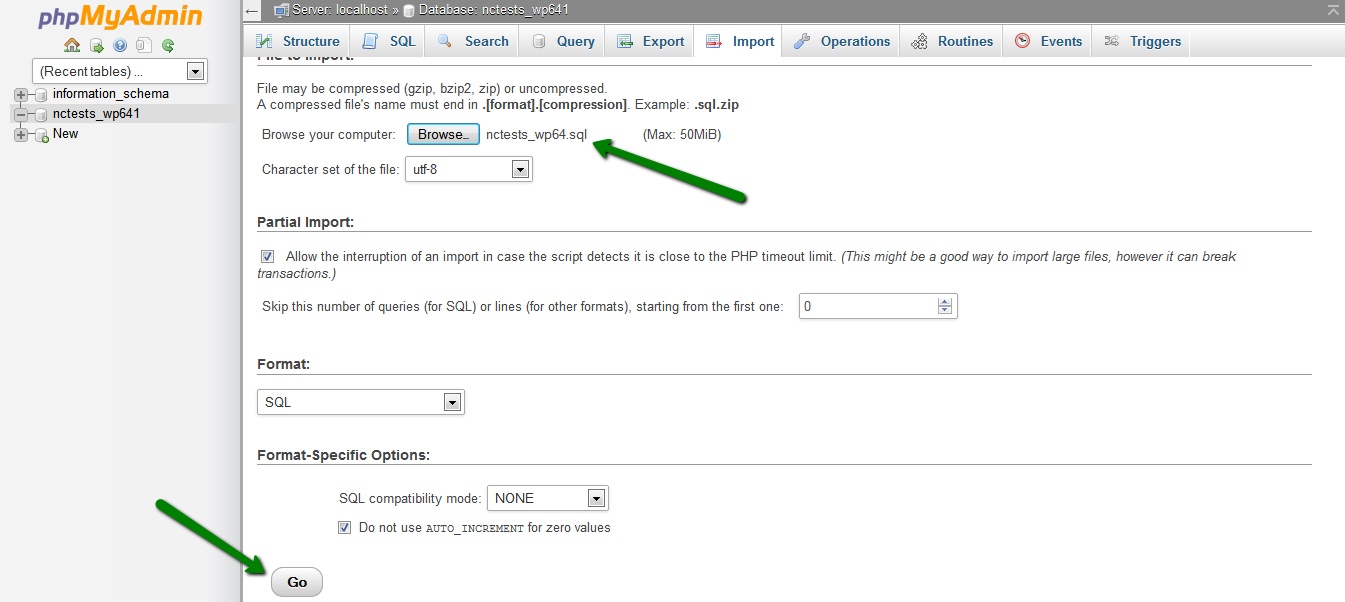
9. Select the newly created database from the list on the left and use switch to Import tab. There you will need to use Browse option to pick up the database .sql file from your local device:
NOTE: If your database is more than 50Mb, import the database following the steps in this guide.
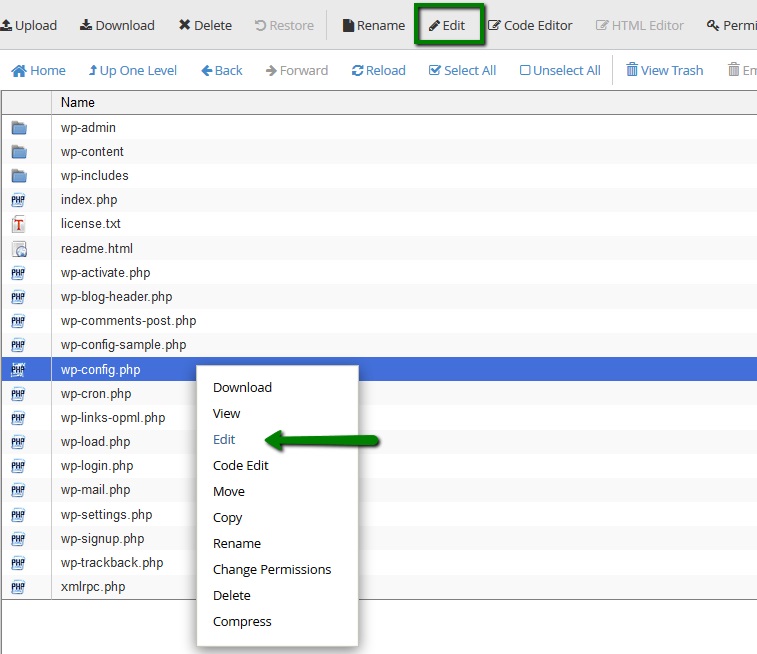
10. Once done, you will need to update wp-config.php file in your installation root folder:
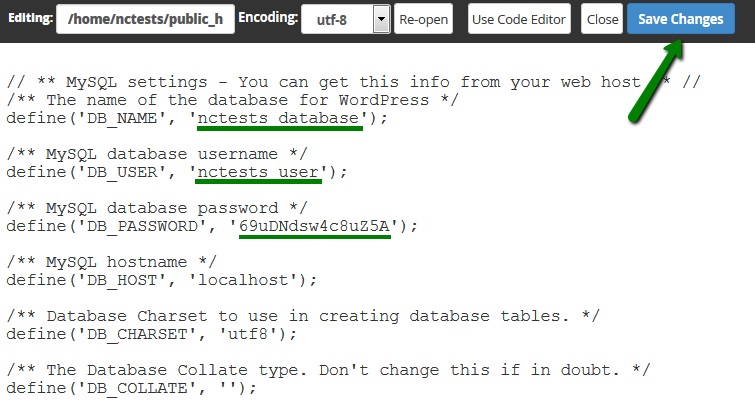
The fields to be changed are:
define ‘DB_NAME’ line – the name of the new database you’ve created in MySQL Databases menu.
define ‘DB_USER’ line – the name of the new user you you’ve created in MySQL Databases menu.
define ‘DB_PASSWORD’ line – the new password you’ve set for database user in MySQL Databases menu.
Save the changes and feel free to check your website.
If everything is working fine, you may delete the old database you used for the website.
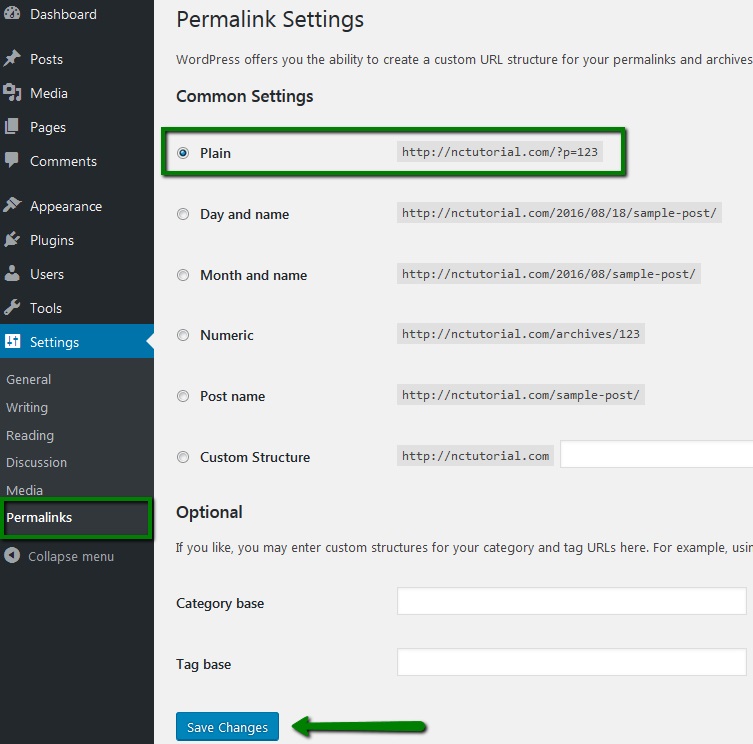
11. It is also advised to re-generate the permalinks to make sure they have the new URL. You can do it in your WordPress dashboard in Settings menu > Permalinks.
So if you had Post name, you need to switch it to Plain, for instance, save the changes and then revert everything back:
for cPanel x3 theme:
Re-installation
Redirection
File migration and Database update
Re-installation
If you just installed your website and have done no or little development, WordPress re-installation will be the easiest way out.
You just need to go back to cPanel > Software/Services section > Softaculous > WordPress, make sure the In Directory field is empty and proceed with the installation.
Do not forget to uninstall the /wp website in Softaculous once done:
Redirection
If the website is pretty much done and re-installation is not acceptable, you can set up a hidden redirect – the installation will remain in the /wp subfolder, but your website homepage will be yourdomain.com.
Take into account that this redirect will make /wp disappear only on the homepage, links will still have it – e.g., yourdomain.com/wp/contactus.
If it sounds alright to you, add the following redirect to the .htaccess file in the domain web root (replacing yourdomain.com with your actual domain name and wp with your subfolder)
RewriteEngine On
RewriteCond %{HTTP_HOST} ^(www\.)?yourdomain.com$
RewriteCond %{REQUEST_URI} !(/|\.[^/]*)$
RewriteRule (.*) http://www.yourdomain.com/$1/ [L,R=301]
RewriteCond %{HTTP_HOST} ^(www\.)?yourdomain.com$
RewriteCond %{REQUEST_URI} !^/wp/
RewriteRule ^(.*)$ /wp/$1
File migration and Database update
If the variants above do not work for you, and you would like to make sure there is no /wp on your website, you can go with this option.
We highly recommend to back up website files and the database before proceeding.
1. File migration
Go to your website folder using FTP or File Manager:
Select All files > Move them to the domain document root (in our example, from public_html/wp to public_html):
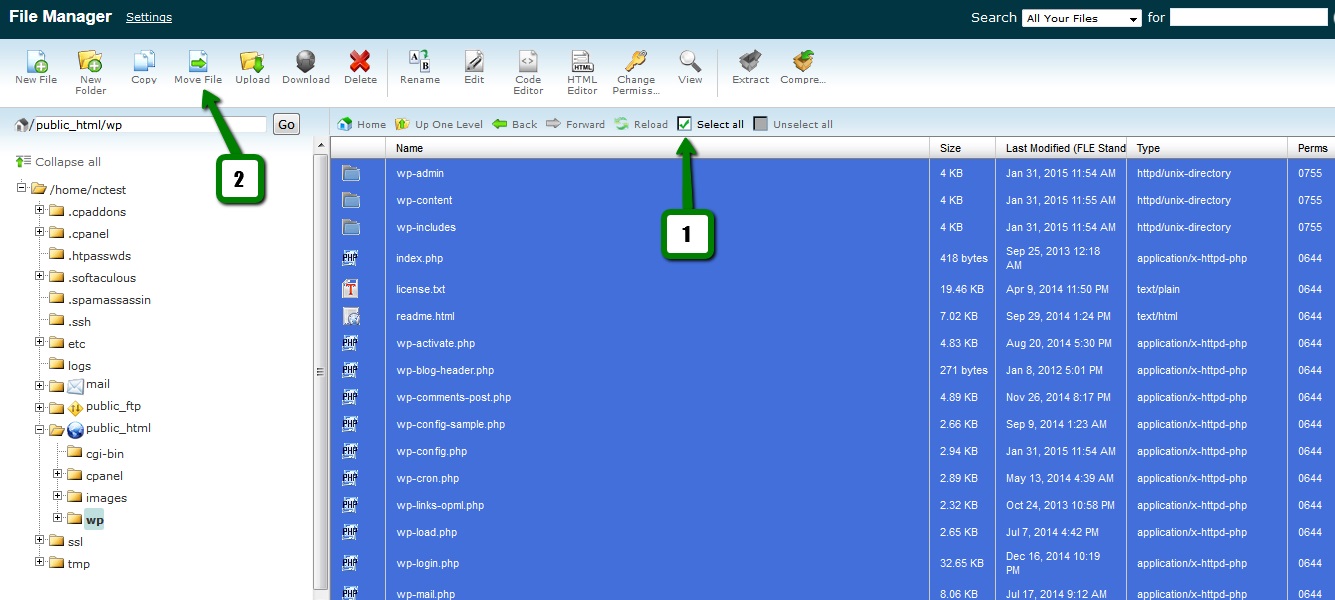

Once done, go back to the domain document root to make sure all files have been moved:
You can update old URL references with the new ones in the database either using search and replace scripts or using text editors.
Below we provide the guidelines using the latter.
- Check what database is used for your WordPress website. You can check it in the wp-config.php file located in the WordPress installation folder:
- Go to cPanel > Databases section > phpMyAdmin.
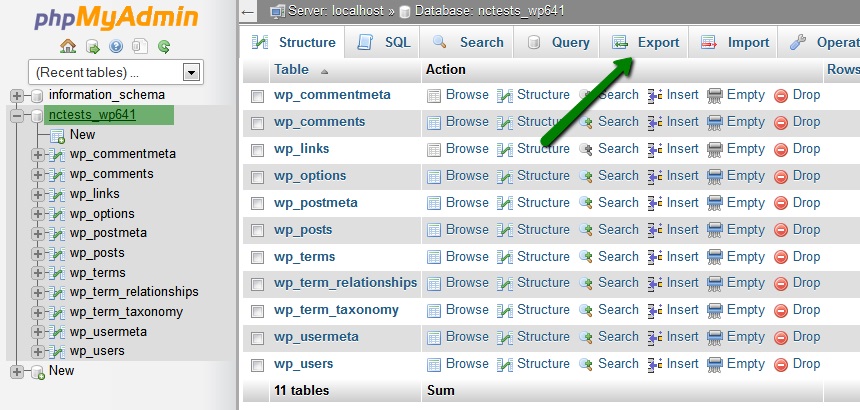
- Select the database in question and click on Export > Go:
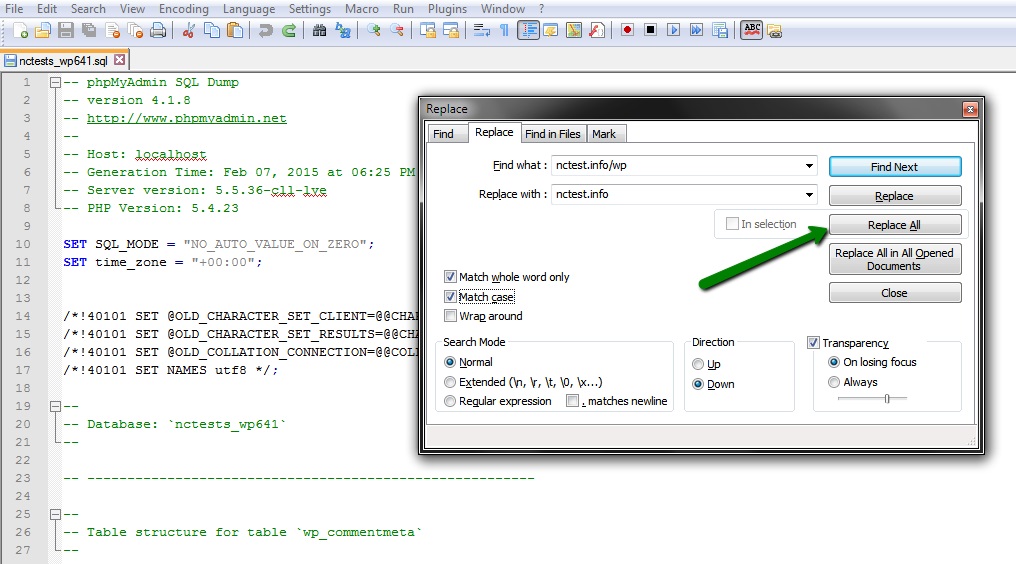
- The database will be downloaded to your computer. Now you need to open it and update all yourdomain.com/wp references with yourdomain.com.Once opened, click Ctrl+F and choose the tab Replace. Fill out the fields below correspondingly > Replace All:
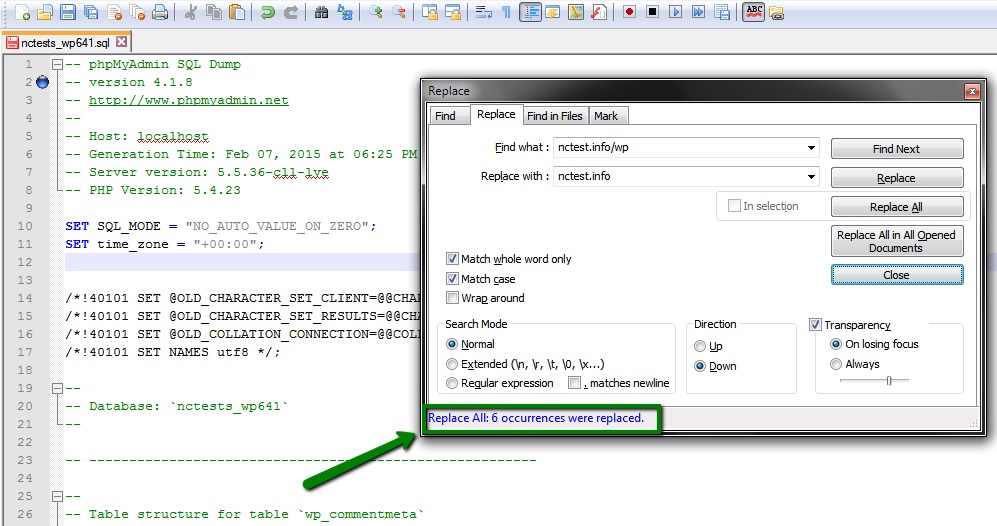
- Once done, the prompt below will display the result:
- Save the updated database and exit the application.
- Now go back to cPanel > Databases section > phpMyAdmin and select your database.
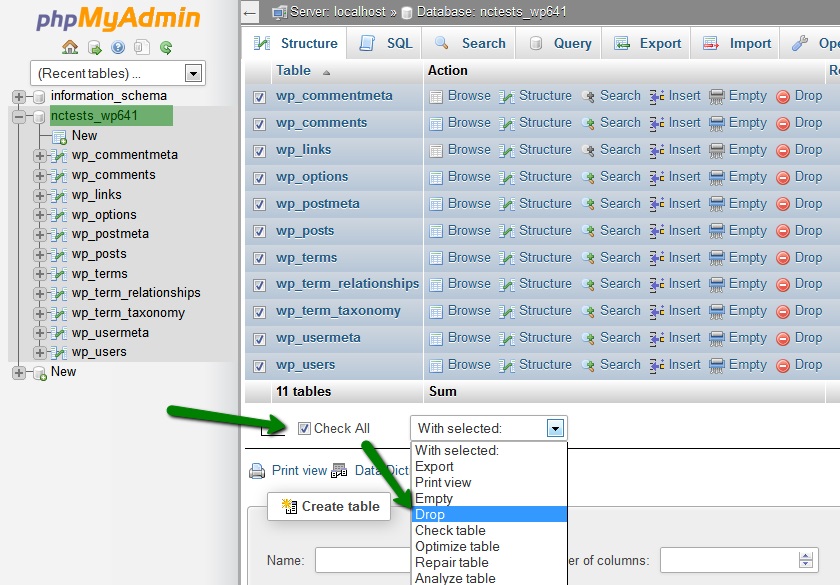
- Check all tables using the option below and select Drop from the drop-down menu:
- On the next page, confirm the actions by clicking Yes:
- Once the old tables are dropped, go back and select the database > Import:
- Choose the updated database from your computer files to upload > Go:
- You will see a green status bar – this will indicate that the database has been successfully imported. On your right, a database tables tree will appear:
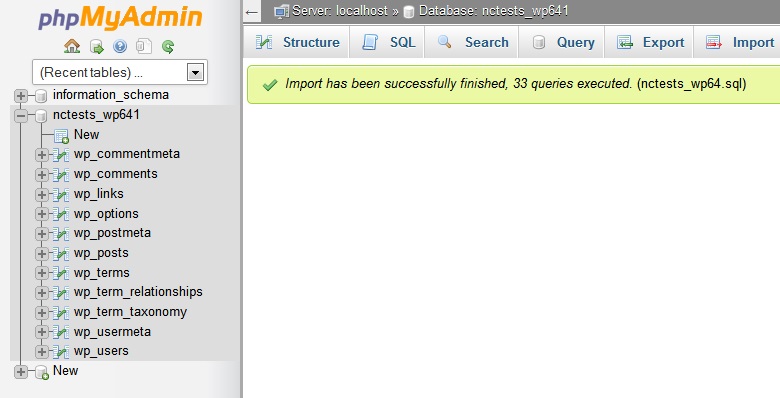
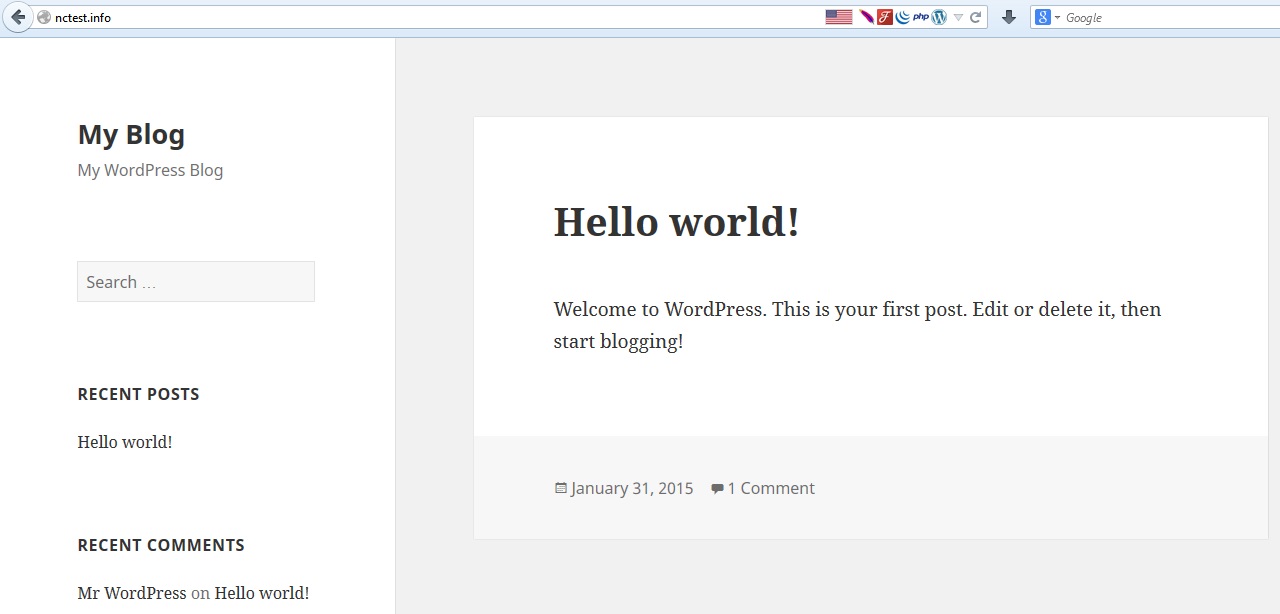
Go back to your website and refresh the page to check the results:
How to reset WordPress admin password
How to reset WordPress admin password
There are three ways to reset a lost WordPress dashboard password:
Using the Lost Password option
Using Softaculous Apps installer
In the database
Using the Lost Password option
1. Open your WordPress administrative login page – it is usually located in http://yourdomain.com/wp-admin.
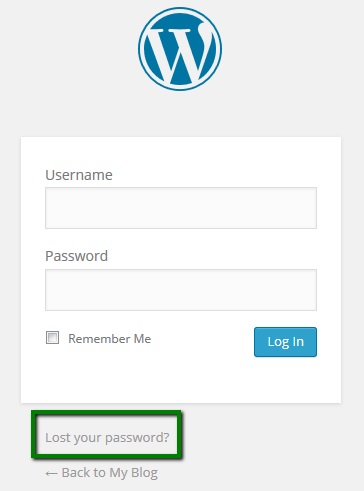
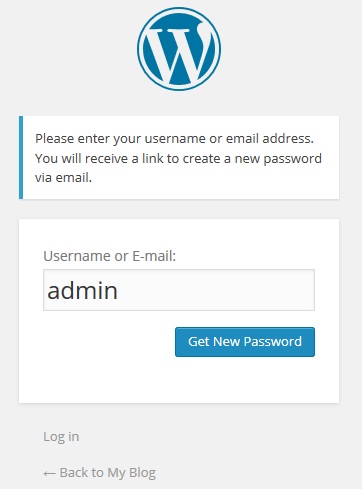
2. Click on the Lost your password? option, fill out the username or email address > Get New Password:
3. Log into your email account, which is set as your administrative WordPress contact. You can find the email message with the password reset URL there, click on it: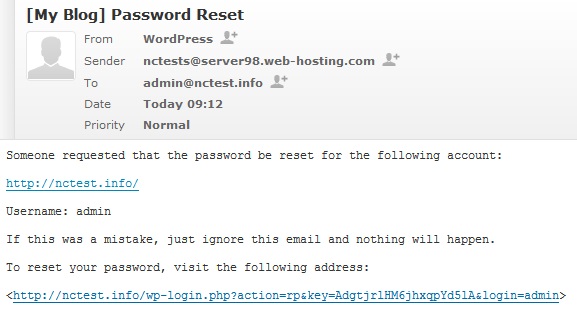
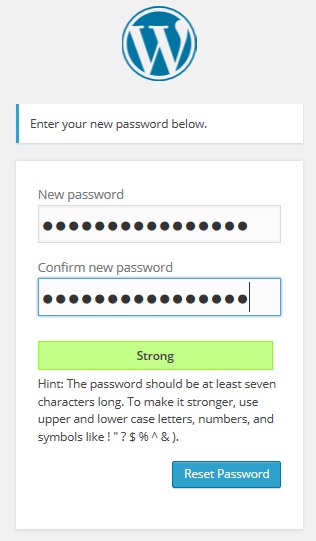
4. Enter your new strong password twice on the opened page > Reset password:
Using Softaculous Apps installer
In order to change the password for your WordPress admin user, follow next steps:
1. Log into cPanel and navigate to Softaculous Apps Installer menu:
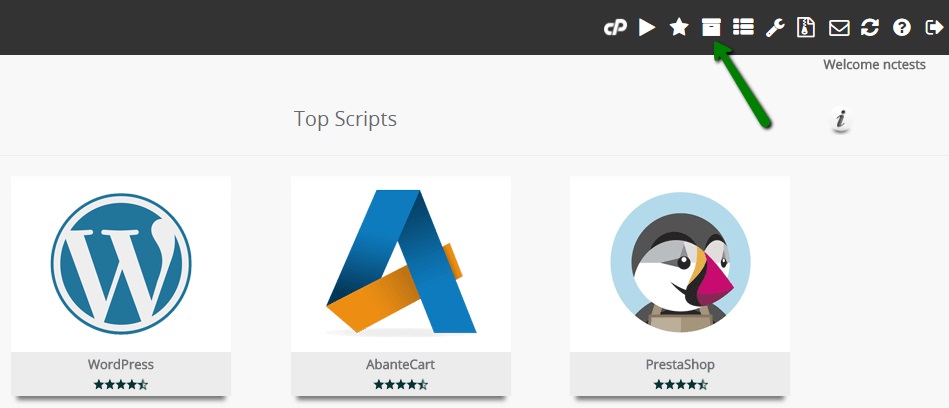
2. In the Softaculous interface find All Installations icon in the top right corner:
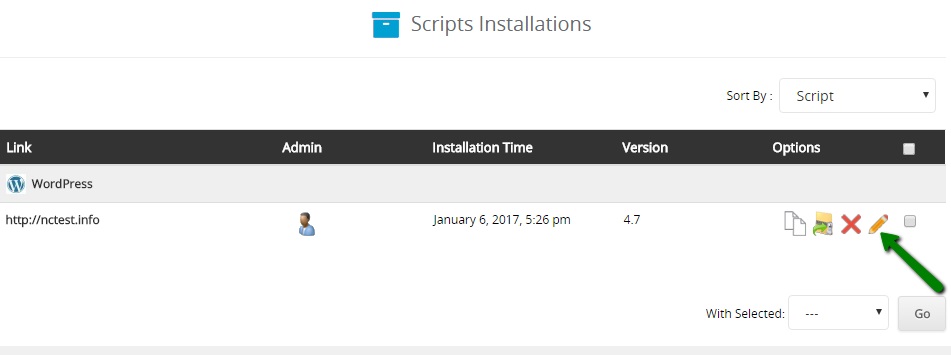
3. In this menu you will see Scripts Installations list. Select the one you need to change the admin password for and click on Edit Details (pencil icon) next to it:
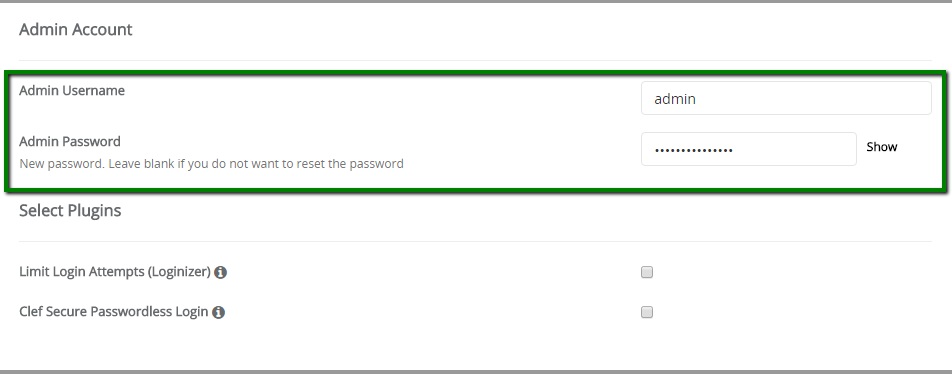
4. Next you will see installation details page. Scroll down to Admin Account section. Here you need to enter your current username and the new password in Admin Password field:
5. Once done, scroll down to the bottom of the page and hit Save installation details button:
6. After that you will receive the message about the successful update:
Feel free to log in to WordPress admin panel using the new password.
Reset the password via the database
If Lost your password? confirmation emails do not arrive, or if you have no access to the email account linked to your administrative dashboard, you can reset your password via MySQL database:
1. Log into your cPanel > section Files > File manager and navigate to the document root of your WordPress website:
2. To check what database is used for your WordPress website, open the wp-config.php file located in:
3. Go to cPanel > Databases section > phpMyAdmin:
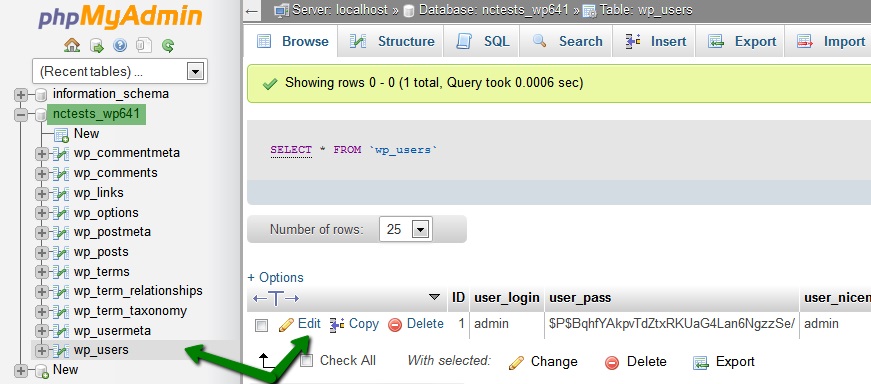
4. Select the database in question, table wp-users and click on Edit next to the admin user:
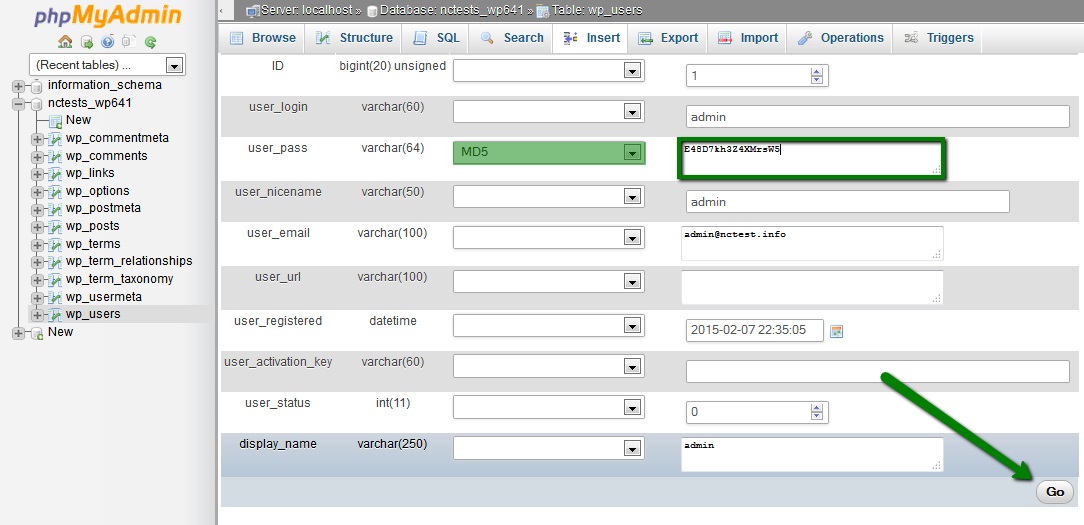
5. On the next page, type in your new strong password into the user_pass box, select MD5 in the Function column and click Go:
You can now go back to the WordPress dashboard page and try to log in with the new password.
What is a VPS?
What is a VPS?
With a VPS, you open a world of possibilities that would not be possible on shared hosting because of restrictions.
VPS stands for Virtual Private Server. This refers to the partitioning of a physical server into multiple servers. In effect, each one acts just like a dedicated server, you get all the features of a dedicated server but at a lower price. Each VPS has its own operating system, and each can be rebooted separately. These operating systems each receive a specific share of the resources of the physical server, no more and no less, they are isolated from each other so that one cannot interfere with another. If one VPS experiences problems or tries to use too much memory or CPU resources, it has no effect on the others.
There are many advantages to selecting a VPS, it costs less than a fully dedicated server and provides a great deal of freedom and flexibility over the limitations and restrictions of shared hosting. You are limited only by the capabilities of the VPS, so select one powerful enough to meet your needs. You can always upgrade later if you decide it becomes necessary.
As for virtualization technologies we offer KVM VPS servers.
Since you are supposed to manage your VPS yourself, we recommend you have a good understanding of Linux commands and are familiar with the WHM/cPanel control panel. You can get a VPS without WHM/cPanel, but in this case, you would need to have very advanced knowledge of Linux.
If you don’t feel you have the technical expertise necessary to manage your own VPS, there is no need to let that stop you – you can select full management for an additional fee.
You won’t have root access, and it will act much like a shared hosting plan, but you will still make the decisions.
cPanel is required if you choose full management for a VPS.
What is the difference between shared hosting and VPS?
What is the difference between shared hosting and VPS?
What is the difference between shared hosting and VPS?
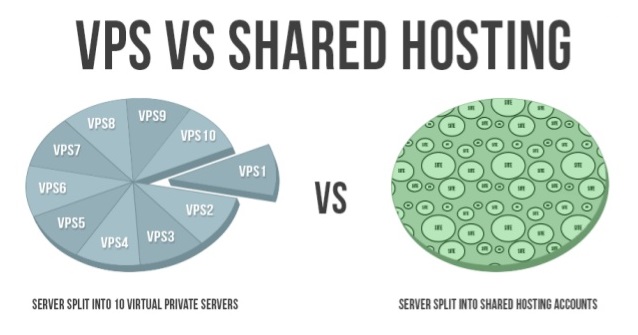
It is the same difference as between a dedicated server and usual shared hosting.
With a VPS, you receive all the power of dedicated hosting with the ability to have your own set of services and customizable disk space. With shared hosting, you have limited administrative access and can’t customize software configurations, while with a VPS you can perform any actions from your control panel and don’t need to contact technical support with every single request.
ویژگی های یک پاوربانک خوب کدام است؟
<
شاید شما هم با مشکلات تمام شدن باتری موبایل یا تبلت و لپتاپ خود در موقعیت های نامناسب درگیربوده اید و در این هنگام از کسی شنیده باشید: “خب یه پاوربانک بخر”ولی پاوربانک یا مترادف فارسی آن شارژر همراه چیست؟
کلیک – پاور بانک یک باتری اکسترنال(خارجی) هست که برای شارژ مجدد باتری موبایل، لپتاپ و یا تبلت، mp4 و سایر لوزام الکترونیکی مشابه به کار می رود.اساس ساز و کار یک پاور بانک بسیاره ساده است .شما پاوربانک را به برق متصل می کنید تا خودش شارژ یا فول شود.سپس از آن در مواقع ضروری برای شارژ وسایل الکترونیکی خود به کار می گیرید.
یک پاور بانک از اجزای زیر ساخته شده است:یک مدار کنترل کننده باتری، شارژر و یک باتری یونی با ظرفیت مشخص
اگر بپرسید یک پاور بانک می تواند چقدر باتری شما را شارژ کند پاسخش به ظرفیت خود توان پاور بانک شما برمیگردد مثلا یک پاور بانک۱۲۰۰۰ در ساعت می تواند ۱۲۰۰۰ میلی آمپر را در یک ساعت شارژ کند .و اگر گوشی شما ۲۰۰۰ میلی آمپر مصرف کند یعنی شارژر همراه شما می تواند ۶ بار این کار را انجام دهد.
عمر باتری یک شارژر همراه چیزی بین ۵۰۰ یا ۳۰۰ تا ۱۰۰۰ بار است بخاطر همین بهتر است شما پاوربانکی را انتخاب نمایید که بهترین عملکرد و توان و عمر بیشتر را داشته باشد بهترین باتری ها متعلق به کمپانی های سونی و پاناسونیک و سامسونگ است.پس هنگام خرید به این مارک ها توجه بیشتری بکنید.
در هنگام خرید یک پاور بانک به نکات زیر توجه کنید:
- سعی کنید پاوربانکی با باتری معتبر بخرید تا عمر پاوربانک شما بالاتر باشد
- توصیه ی ما پاوربانک هایی با پورت هوشمند یا Smart هستند این
- پاوربانک ها نسبت به وسیله ای که با آن شارژ می شود جریان خود را تغییر می دهند
- پاور بانک تبلت با پاوربانک گوشی متفاوت است .تبلت به سبب کارکردش مطمئنا جریان برق بیشتری برای ذخیره نیاز دارد و اگر از شما از پاوربانک متفاوتی استفاده نمایید تبلت شما کامل شارژ نمی شود.
- سعی کنید پاوربانک های micro USB خریداری کنید.چون آنها استاندارد هستند.
- حتما قبل از خرید به مشخصات پاوربانک دقت کنید که به مشخصات وسایل شما بخورد.
- پاوربانکهایی را ترجیح دهید که روی آنها لامپ LED دارد.چون وضعیت شارژ و باتری را نشان می دهند.
نکاتی که باید در مورد نحوه ی استفاده ی درست از پاور بانک بدانید در چند مورد زیر خلاصه می شود:
- همزمان از پاوربانک برای شارژ و دشارژ استفاده نکنید،یعنی در حالی که پاوربانک شما متصل به برق است و در حال شارژ شدن است از آن برای شارژ گوشی یا تبلت استفاده نکنید.
- همیشه از یک پورت پاور بانک برای شارژ استفاده کنید چون اگر پاوربانک شما دو پورت خروجی داشته باشد و شما همزمان از آن استفاده کنید میزان جریان در هر کدام آن یکی نخواهد بود.
- سعی کنید منتظر بمانید تا پاور بانک شما کامل شارژ شود و بعد از آن استفاده کنید چون با هربار استفاده ی نامناسب آن باعث می شوید که از عمر باتری پاور شما کم شود.
برای خرید پاوربانک می توانید به فروشگاه اینترنتی تکین مال مراجعه نمایید.
